지금까지 한 것을 정리해보자면,
- 나의 서비스를 사용하고자 하는 사용자가 Authorization Server에서 제공해주는 곳에서 로그인을 했다.
- Authorization Server에서 로그인 정보를 확인하고 인증해 Code를 나의 서비스에 주었다.
- 나의 서비스는 Kakao Resource Server에 접근해 로그인 한 사용자의 정보를 갖고 싶다.
- Code+Client Id+Client Secret을 통해 Kakao Authorization Server에서 Access Token을 받았다.
🧐 Access Token으로 Kakao Resource Server에서 나의 서비스가 원하는 사용자의 정보들을 받아와 보자!

카카오 문서에서 사용자 정보 요청 Rest API는 두 가지 방식으로 사용할 수 있도록 한다.
사용자 액세스 토큰과 앱 어드민 키를 사용하는 두 가지 방식인데, 우리는 사용자 액세스 토큰을 사용해 요청해볼 것이다.
사용자 정보 요청도 액세스 토큰을 받아오는 것처럼 알맞은 정보들을 POST로 Resource Server에 요청하면 된다.
🔍 1. Http 객체 (Header+Body) 만들기
우선 Header에는 Access Token만 넘겨주면 된다.

그리고 Body에는 아무것도 안 넣어주어도 되고 아래 표를 추가적으로 넣어줘도 된다.

JAVA로 Header를 HttpEntity에 넣어준 코드 (자세한 설명은 아래 글을 참고하면 된다.)
자세한 클래스, 메소드 정보 참고 : https://withseungryu.tistory.com/116
 HttpHeaders headers = new HttpHeaders();
        headers.add("Authorization", "Bearer "+ oauthToken.getAccess_token());
        headers.add("Content-type", "application/x-www-form-urlencoded;charset=utf-8");


HttpEntity<MultiValueMap<String, String>> kakaoProfileRequest =
        new HttpEntity<>(headers);
지금까지 Kakao Resource Server에 요청할 Http Entity를 만들었다.
🔍 2. POST 요청하기
이제 Http Entity를 아래 나온 형식대로 Resource Server에 POST 요청을 해주자.

//Http 요청하기 - POST 방식으로 - 그리고 response 변수의 응답을 받음.
ResponseEntity<String> response = rt.exchange(
      "https://kapi.kakao.com/v2/user/me",
      HttpMethod.POST,
      akaoProfileRequest,
      String.class
);
자세한 클래스, 메소드 정보 참고 : https://withseungryu.tistory.com/116
[Spring Boot] 간단하게 HTTP POST 요청하기
💡 POST 요청이란? 서버에 요청하는 방식 클라이언트가 서버에 요청을 할 때 제공해야하는 자원이 있을 때 Get방식은 요청하는 자원을 URL에 뒤에 보내는 반면 POST방식은 URL에 붙이지 않고 따로 데
withseungryu.tistory.com
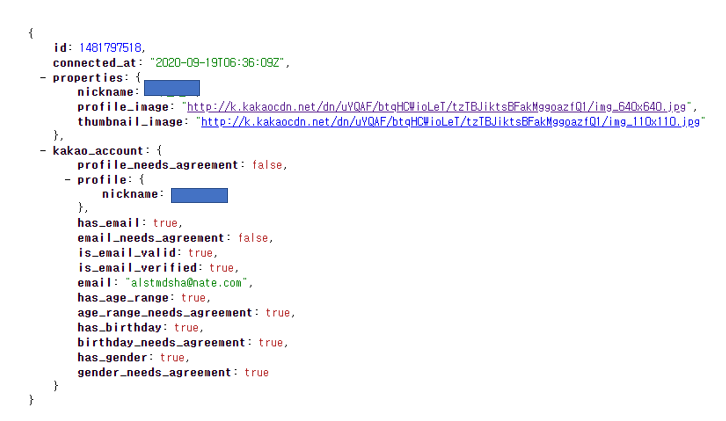
이렇게 요청을 해주면 아래와 같은 정보들이 response에 저장될 것이다.

🔍 3. JAVA 객체에 맵핑하기
이제 ObjectMapper를 사용해 객체에 저장해주면 된다.
ObjectMapper에 저장하는 방식은 앞선 code를 받아와 Access Token을 저장하는 방식과 동일하다.
ObjectMapper objectMapper = new ObjectMapper();
KakaoProfile profile  =null;
//Model과 다르게 되있으면 그리고 getter setter가 없으면 오류가 날 것이다.
try {
    profile = objectMapper.readValue(response.getBody(), KakaoProfile.class);
} catch (JsonProcessingException e) {
    e.printStackTrace();
}
ObjectMapper로 Mapping 해줄 KakaoProfile.class
import lombok.Data;

@Data
public class KakaoProfile {

    public int id;
    public String connected_at;
    public Properties properties;
    public KakaoAccount kakao_account;


    @Data
    public class Properties {

        public String nickname;
        public String profile_image;
        public String thumbnail_image;

    }

    @Data
    public class KakaoAccount {

        public Boolean profile_needs_agreement;
        public Profile profile;
        public Boolean has_email;
        public Boolean email_needs_agreement;
        public Boolean is_email_valid;
        public Boolean is_email_verified;
        public String email;
        public Boolean has_age_range;
        public Boolean age_range_needs_agreement;
        public Boolean has_birthday;
        public Boolean birthday_needs_agreement;
        public Boolean has_gender;
        public Boolean gender_needs_agreement;


        @Data
        public class Profile {

            public String nickname;
//            public String thumbnail_image_url;
//            public String profile_image_url;

        }
    }

}
전체 코드 :
public void getProfile(OAuthToken oauthToken, UserRepository userRepository){
        RestTemplate rt = new RestTemplate(); //http 요청을 간단하게 해줄 수 있는 클래스

        //HttpHeader 오브젝트 생성
        HttpHeaders headers = new HttpHeaders();
        headers.add("Authorization", "Bearer "+ oauthToken.getAccess_token());
        headers.add("Content-type", "application/x-www-form-urlencoded;charset=utf-8");


        HttpEntity<MultiValueMap<String, String>> kakaoProfileRequest =
                new HttpEntity<>(headers);

        //실제로 요청하기
        //Http 요청하기 - POST 방식으로 - 그리고 response 변수의 응답을 받음.
        ResponseEntity<String> response = rt.exchange(
                "https://kapi.kakao.com/v2/user/me",
                HttpMethod.POST,
                kakaoProfileRequest,
                String.class
        );


        ObjectMapper objectMapper = new ObjectMapper();
        KakaoProfile profile  =null;
        //Model과 다르게 되있으면 그리고 getter setter가 없으면 오류가 날 것이다.
        try {
            profile = objectMapper.readValue(response.getBody(), KakaoProfile.class);
        } catch (JsonProcessingException e) {
            e.printStackTrace();
        }

        //username, password, email
        User user = new User();
        user.setName(profile.getProperties().getNickname());
        user.setEmail(profile.getKakao_account().getEmail());
        user.setGender(1);
        user.setAge_range(25);
        user.setBirth(9999);

        userRepository.save(user);

    }
}
참고 : https://developers.kakao.com/docs/latest/ko/kakaologin/rest-api#request-token
Kakao Developers
카카오 API를 활용하여 다양한 어플리케이션을 개발해보세요. 카카오 로그인, 메시지 보내기, 친구 API, 인공지능 API 등을 제공합니다.
developers.kakao.com
'Back-end > SpringBoot' 카테고리의 다른 글
| [Spring Boot] 차근차근 OAuth 2.0 구현하기 - (3) Access Token 받기 (1) | 2020.10.01 |
|---|---|
| [Spring Boot] 차근차근 OAuth 2.0 구현하기 - (2) Code 가져오기 (0) | 2020.09.22 |
| [Spring Boot] 차근차근 OAuth 2.0 구현하기 - (1) 개념 정리 (0) | 2020.09.14 |
| [Spring Boot] Rest API 구현 (Feat. spring date rest) (0) | 2020.08.30 |
| [Spring Boot] YAML 파일 매핑하기 (Feat. @ConfigurationProperties) (0) | 2020.08.29 |
