728x90

TODO LIST 만들어보기 Vue with Typescript (뷰 + 타입스크립트) (2)
List Component (Vuex 적용 전)
우선 기본적인 틀 (편리함을 위해 CLASS API 방식을 사용하겠습니다. 또한 Bootstrap 4를 사용하겠습니다.)
※ BootStrap 4를 적용시키는 방법은 nuxt.config.js 파일의 head 내 link 부분에 아래 코드를 추가해주시면 됩니다.
{ rel: 'stylesheet', href: 'https://maxcdn.bootstrapcdn.com/bootstrap/3.3.2/css/bootstrap.min.css'}components/List.vue
<template>
    <div>
        <div class="input-group" v-for="item in itemList" >
            <span class="input-group-addon" id="basic-addon1">
                <input type="checkbox" :checked="item.status == 'clear'" >
            </span>
            <input type="text" class="form-control" :value="item.content"/>
            <span class="input-group-btn">
                <button class="btn btn-default" type="button" v-on:click="removeItem(item.id)">X</button>
            </span>
        </div>
    </div>
</template>

<script lang="ts">
    import Vue from 'vue'
    import {Component} from 'vue-property-decorator'

    interface ItemList{
        id : number;
        content : string;
        status : string;
    }

    @Component
    export default class List extends Vue{
        itemList : ItemList[] = []

        created(){
            this.itemList = this.$store.state.itemList;
        }

        removeItem(id: number){
            this.$store.commit('removeItem', id );
        }


    }


</script>

<style scoped>

</style>
☞ Vuex를 적용해서 Store를 만들기 전에 미리 리스트로 보여줘야 하기 때문에 임시로 itemList를 만들어줍니다.
itemList : ItemList[] = [
            {id: 1, content : '씻기', status: 'clear'},
            {id: 2, content : '준비하기', status: 'clear'},
            {id: 3, content : '학교가기', status: 'clear'},
            {id: 4, content : '게임하기', status: 'yet'},
        ];
☞ ItemList 인터페이스를 만든 이유 : itemList는 아이템들의 id, content, status를 포함하는 객체의 배열이기 때문에 만들어주었으며, any []를 사용하지 않기 위해서입니다. (any타입은 가장 유혹적인 모든 타입이 사용될 수 있도록 해주는 타입이지만, Typescript에서 any타입은 안정성 등 많이 부분에서 문제가 있어 가장 피해 줘야 할 타입인 거 명심해 주세요!)
interface ItemList{
        id : number;
        content : string;
        status : string;
    }
☞ 리스트 렌더링 v-for 를 사용해서 객체 배열 순서대로 리스트 만들어줍니다.
(참고: https://kr.vuejs.org/v2/guide/list.html)
<div class="input-group" v-for="item in itemList" >
            <span class="input-group-addon" id="basic-addon1">
                <input type="checkbox" :checked="item.status == 'clear'" >
            </span>
            <input type="text" class="form-control" :value="item.content"/>
            <span class="input-group-btn">
                <button class="btn btn-default" type="button" v-on:click="removeItem(item.id)">X</button>
            </span>
</div>
☞ status가 clear ( 끝난 상태)이면 check box에 체크가 돼있어라.
<input type="checkbox" :checked="item.status == 'clear'" >pages/index.vue
<template>
  <div class="container">
    <List></List>
  </div>
</template>

<script lang="ts">
  import Vue from 'vue'
  import {Component} from 'vue-property-decorator'
  import List from '~/components/List'

  @Component({
    components: {
        List,
    }
  })
  export default class Index extends Vue{

  }

</script>

<style>

</style>
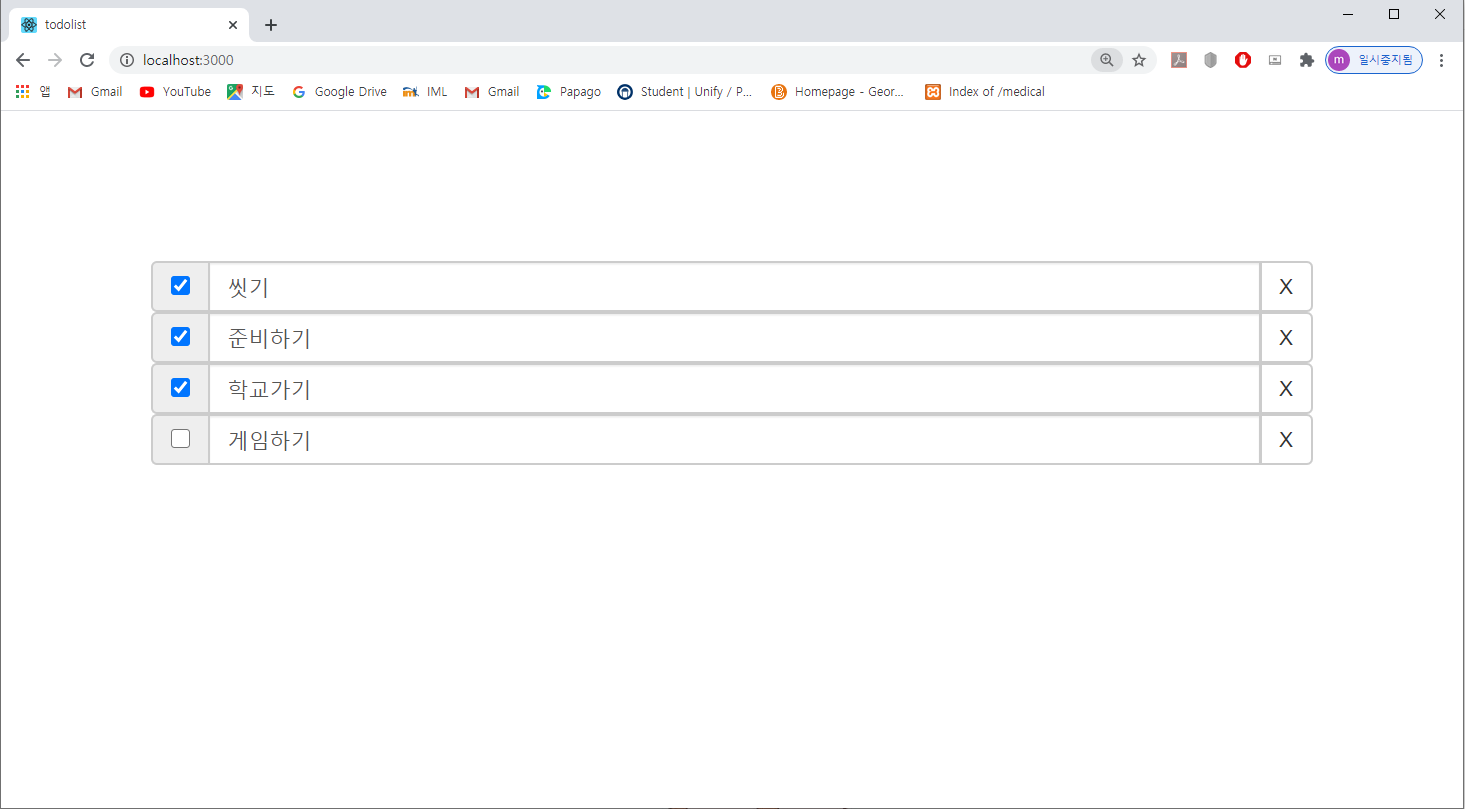
☞ List Component 기본 틀 완성! , 아래와 같은 결과를 보실 수 있습니다.

궁금하신 점이 있으시면 바로 댓글 달아주세요~

728x90
반응형
