TODO LIST 만들어보기 Vue with Typescript (뷰 + 타입스크립트) (5)
☞ Axios란?
axios는 HTTP 클라이언트 라이브러리로써, 비동기 방식으로 HTTP 데이터 요청을 실행합니다.
내부적으로 AXIOS는 직접적으로 XMLHttpRequest를 다루지 않고 “AJAX 호출”을 할 수 있습니다.
따라서 Axios를 사용해 프로젝트 내에 있는 JSON 파일에 저장되어 있는 itemList를 Store에 itemList에 저장시켜보겠습니다.
☞ 우선 알아둬야 할 점은, Vuex의 원리입니다.
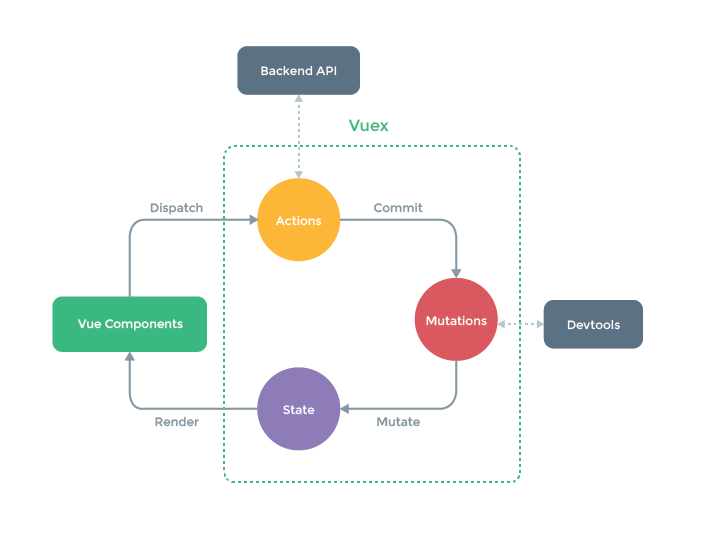
아래 그림과 같이 vuex는 크게 State, Mutations, Actions로 구성이 가능합니다.
앞서 만들어봤듯이, state는 클래스의 멤버와 같은 역할이고, mutation은 메서드와 같은 역할을 한다는 것을 알 수 있었는데, 과연 action은 무슨 역할을 할까요?
Action의 역할은 실행해야 할 기능이 비동기 기능일 때 사용할 수 있습니다. 즉, 동기적일 때는 mutation, 비동기적일 때는 action을 사용합니다.

Axios는 비동기적이기 때문에 Action에서 기능을 구현할 수 있습니다.
☞ 우선, Axios를 설치해줍니다.
npm install axios
☞ 그 후 Axios를 Vue 애플리케이션에서 사용하기 위해 몇 가지 설정을 해줍니다.
1. service 폴더를 만들어 axios.service.ts 파일을 만들어 api 서버 주소를 설정해줍니다
import axios, { AxiosInstance } from 'axios';

export default class AxiosService {
    static readonly instance: AxiosInstance = axios.create({
        baseURL: ' http://localhost:3000',
        timeout: 100000,
    });
}
2. store/index.ts 파일에서 사용할 것이기 때문에 AxiosService, AxiosResponse를 import 해줍니다.
import AxiosService from '~/service/axios.service';
import AxiosResponse from '~/service/axios.service';
☞ 이제 @Action을 사용해 Axios를 사용해 JSON 객체를 받아 올 수 있도록 코드를 작성해보겠습니다.
영어의 뜻대로 AxiosService의 get으로 JSON을 불러와 AxiosResponse를 이용해 받아와 저장시켜줍니다.
const response: AxiosResponse = await AxiosService.instance.get('/data.json');※ 여기 중요한 점은 AxiosService 앞에 await을 붙이고, Action 함수 명 앞에 async를 붙여 비동기 방식 호출을 해 줄 수 있도록 합니다.
Async, Await은 비동기 호출에 사용 할 수 있는 javascript Function인데, 자세한 점은 아래를 참고해주세요.
https://developer.mozilla.org/ko/docs/Web/JavaScript/Reference/Statements/async_function
async function
async function 선언은 AsyncFunction객체를 반환하는 하나의 비동기 함수를 정의합니다. 비동기 함수는 이벤트 루프를 통해 비동기적으로 작동하는 함수로, 암시적으로 Promise를 사용하여 결과를 반환
developer.mozilla.org
☞ vuex의 기본 원리는 위의 그림과 같이 컴포넌트에서 Action을 실행시키고, Action에서 Mutation을 그리고 state를 불러오는 원리로 진행됩니다.
따라서 Action 내부에서 commit으로 setItem mutation을 호출해줍니다.
this.context.commit('setItem', response.data.itemList);/store/index.ts
import { Module, Mutation, Action, VuexModule } from 'vuex-module-decorators';
import AxiosService from '~/service/axios.service';
import AxiosResponse from '~/service/axios.service';

interface ItemList {
    id: number;
    content: string;
    status: string;
}


@Module
export default class Store extends VuexModule{

    itemList : ItemList[] = []

    //아이템 추가 Mutation
    @Mutation
    addItem(item: ItemList){
        this.itemList.push(item);
    }
    //해당 아이템 제거 Mutation
    @Mutation
    removeItem(id: number){
        const idx = this.itemList.findIndex(function (param) {
            return param.id === id
        })
        this.itemList.splice(idx , 1 );
    }
    //해당 아이템 status 변경
    @Mutation
    changeStatus(item: ItemList){
        const idx = this.itemList.findIndex(function (param) {
            return param.id === item.id
        })
        if (item.status === 'yet'){
            this.itemList[idx].status = 'clear';
        } else{
            this.itemList[idx].status = 'yet';
        }
    }

    @Mutation
    setItem(itemList: ItemList[]){
        this.itemList = itemList;
    }

    @Action
    async getItem(){
        const response: AxiosResponse = await AxiosService.instance.get('/data.json');
        this.context.commit('setItem', response.data.itemList);
    }
    get setYet(){
        return this.itemList.filter((item: ItemList) => item.status === 'yet')
    }
    get setClear(){
        return this.itemList.filter((item: ItemList) => item.status === 'clear' )
    }


}
☞ Axios로 data.json에서 데이터를 받아 store state itemList에 저장을 시켜줄 수 있는 vuex를 만들었습니다.
자! 이제 컴포넌트에서 store에서 action을 dispatch 해주면 끝.
this.$store.dispatch('getItem');component/List.vue
<template>
    <div>
        <div class="input-group" v-for="item in itemList" >
            <span class="input-group-addon" id="basic-addon1">
                <input type="checkbox" :checked="item.status == 'clear'" @change = "changeStatus(item)" >
            </span>
            <input type="text" class="form-control" :value="item.content"/>
            <span class="input-group-btn">
                <button class="btn btn-default" type="button" v-on:click="removeItem(item.id)">X</button>
            </span>
        </div>
    </div>
</template>

<script lang="ts">
    import Vue from 'vue'
    import {Component, Watch} from 'vue-property-decorator'

    interface ItemList{
        id : number;
        content : string;
        status : string;
    }

    @Component
    export default class List extends Vue{
        itemList : ItemList[] = [];

        created(){
            this.$store.dispatch('getItem');
            this.itemList = this.$store.state.itemList;
        }
        initItem(){
            this.itemList = this.$store.state.itemList;
        }

        removeItem(id: number){
            this.$store.commit('removeItem', id );
            this.initItem()

        }
        changeStatus(item: ItemList){
            console.log(this.$route.params.status);
            this.$store.commit('changeStatus', item );
            this.initItem()
        }

        @Watch("$route.params.status")
        routeUpdate(newValue: string){
            if(!newValue){
                this.itemList = this.$store.state.itemList;
            }else if(newValue === 'yet'){
                this.itemList = this.$store.getters.setYet;
            }else{
                this.itemList = this.$store.getters.setClear;
            }

        }

    }


</script>

<style scoped>

</style>
궁금하신 점이 있으시면 댓글을 달아주세요!!~

'Front-end > Vue' 카테고리의 다른 글
| [Vue] 차근차근 Todo List 만들기 with typescript - (4) Vuex.Store 만들기 (0) | 2020.06.30 |
|---|---|
| [Vue] 차근차근 Todo List 만들기 with typescript - (3) Header, Create Component (0) | 2020.06.29 |
| [Vue] 차근차근 Todo List 만들기 with typescript - (2) List Component (0) | 2020.06.29 |
| [Vue] 차근차근 Todo List 만들기 with typescript - (1) 구조 설계 (0) | 2020.06.29 |
| [Vue] 차근차근 Todo List 만들기 with typescript - (0) 클래스 스타일 Vue 컴포넌트 (0) | 2020.06.29 |
